
Simplifying Local Development for Craft CMS
—Introduction
When you have a team of people working on a project, you all need to be working on the same version of the cms. We’ve always used version control (git) to keep our file changes in sync, but what if we want field changes in the cms to be synced across our local environments too? What we’ve done is to take version control and the project config feature from Craft and also apply some automation to these processes. As a result we are now in a position where any file changes, cms changes, plugin updates, etc are all done for us when we are ready to deploy our changes to the staging site. This has also made local development easier as we always have exactly the same setup in both the files, and the cms whilst keeping our tools simple.
So why MAMP and not valet, homestead, docker, etc?
To put it simply, why not? We didn’t feel the need to jump into all of the various ways of setting up and configuring a local environment, instead we decided to stick to what we know as it works in a very simple way for us with little to no configuration. We’ve installed composer locally to our machines so we can run everything we need through the command line, so MAMP seemed like a logical solution for us as we could jump in and get set up with out site very quickly.
The advantage to this is that whenever we wish to spin up a new or different project, we just change MAMP to point to the correct folder, run our single command on the terminal to trigger our automation scripts, and away we go. Easy peasy.

Composer: let's create a masterpiece
Need help with your digital strategy?
Get in touch — we'd love to hear about your project.
Setting up Composer
We will need to run composer locally to pull in all of our vendor files, typically we gitignore this folder due to the very large size of it and it doesn’t need to be version controlled when composer is handling it all for us. To use composer locally we’ve followed the steps in a blog post we found named Installing Composer on Mac OSX.
The steps in the post we’ve linked to will allow you to install composer locally and also set up an alias command for it so you don’t need to enter the full path. It is important to note also that once this is done for one project, it will always be available for all projects you are working on. This is because it is installing composer into the machines root rather than just at a project level.
Essentially once we’ve installed MAMP and composer, we don’t ever need to repeat these steps and are ready to tackle any project that comes our way with a local development environment.
Configuring Environment Settings
Craft CMS allows us to define multiple environments in our config files and use .env files to create different variables per environment. Running MAMP to host our site locally, our .env file needs to connect to our local database, this means that we set our DB_SERVER to 127.0.0.1, and our DB_PORT to 8889 in accordance with MAMPs default values. It is also important that we make sure our ENVIRONMENT is set to dev locally and staging on our preview server.
Once we have verified that Craft is running locally using our local database connection and we are able to run our composer commands through the terminal, it’s time to delve into a Craft 3.1 feature called project config.
Implementing Project Config
To start using project config we just need to add a single line into our general.php config file. We want to add this to all environments and the setting is useProjectConfigFile which we shall set to true. Once this is done, Craft will generate a new file within the config folder called project.yaml which contains all of our cms settings. The next step we’ve made is to set allowAdminChanges to false for all environments to lock down our cms, we then override this on the dev environment where we set it to true.
Locking down the cms in this way means that changes to the cms can only be made locally on our dev environment, we will never have to worry about fields which were added to a staging site being removed because they’re out of sync. Every time a cms change is made within the settings section, our version control will detect that the project.yaml file has been updated by the cms. We want to regularly be committing this file into our version control (git) so that we all have the same settings whenever we pull down the latest changes. This eliminates the need to add fields multiple times, when we add them on one machine and commit the changes, they will appear on all other machines once they’ve pulled the most recent commits from version control.
Project config allows cms settings to be versioned and shared much like any other standard files such as templates, css, js, etc. The one thing to remember here though is that whenever you pull down the project config file, you will need to sync the changes with the database. This can be done either through the cms in your browser, or via the command line by running ./craft project-config/sync. If you choose to run this through the command line, you may find in your local setup that you need to change the file named craft to have permissions of 744 (rwxr--r--).

Automation saves time and eliminates some problems.
Automating all of the things
Seeing as we’re using composer on all of our Craft projects to manage our vendor folder which holds our plugins and base install, we might as well use it to do a few other things too. Before Craft 3 was released, we weren’t overly familiar with composer, but since then we’ve had to get to grips with it and learn it. Learning and understanding the tools you use is important if you wish to use them in the most effective way. Composer allows us to run Craft commands immediately after an install or update process, this means that we can automate anything that we would normally need to use the command line for on our craft install.
Our default composer file contains a scripts section towards the bottom which we can add to. It is here that we will build up our automation, so let’s decide exactly what it is that we want to do and why. First of all, whenever we run the composer update command we are pulling in all of the new files for the versions specified in our composer.json file. This will update our vendor folder and can update plugins, background libraries, or even Craft itself.
If Craft itself were to update in this manner, Craft sometimes has additional database changes it needs to make which we usually trigger through our browser, this can however be automated. We want to create a process which won’t require a human to log into the cms to press a button for the update to be completed. This means that we will never have to go into our staging environment on the server, it’s mainly used by the client to populate their content. We can do this by running the ./craft migrate/all command. A migration in Craft terms is a database change, and running migrate/all will cover all of our plugins also. This means that running composer update will now handle not only file changes, but database updates also.
The next step we need to take is to sync our project config changes (if any) to ensure that we don’t need an admin user to log in and press the sync button before the client can continue entering their content. By running a project config sync after a composer update we are ensuring that all of our local development changes are applied to the cms. We can do this using the ./craft project-config/sync --force=1 command. Notice that we have added the force flag to this one though. This is because we have encountered issues with project config previously where field layouts weren’t being applied to sections. This flag isn’t always necessary but it can help if the files fall out of sync or encounter a bug, so we’ve just decided to use it by default now to prevent these errors from occurring.
Our last command that we are going to run is ./craft clear-caches/all, this will ensure that any caches are cleared so that our updates are loaded in by the front end of the site correctly. Now that we’ve added our 3 commands to the scripts section of our composer.json file, we should be able to run composer update locally and see that this now also runs any migrations, syncs project config changes, and clears all caches. We still have one last piece of automation to add though. Below is a full copy of our composer file:
        {
  "require": {
    "craftcms/aws-s3": "1.2.2",
    "craftcms/cms": "3.1.25",
    "craftcms/redactor": "2.3.3.2",
    "servd/craft-remote-assets": "^0.1.7",
    "vlucas/phpdotenv": "^2.4.0",
    "yiisoft/yii2-redis": "^2.0.0"
  },
  "autoload": {
    "psr-4": {
      "modules\\": "modules/"
    }
  },
  "config": {
    "sort-packages": true,
    "optimize-autoloader": true,
    "platform": {
      "php": "7.0"
    }
  },
  "scripts": {
    "post-root-package-install": [
      "@php -r \"file_exists('.env') || copy('.env.example', '.env');\""
    ],
    "post-create-project-cmd": [
      "@composer dump-autoload -o",
      "@php craft setup/welcome"
    ],
    "post-update-cmd": [
      "./craft migrate/all",
      "./craft project-config/sync --force=1",
      "./craft clear-caches/all"
    ],
    "post-install-cmd": [
      "./craft migrate/all",
      "./craft project-config/sync --force=1",
      "./craft clear-caches/all"
    ]
  }
}
Automated Deployments
Currently we are uploading files to our staging server via sFTP and then running composer update over an SSH terminal connection. What we would rather do though is automate this of course. We are all about automation as this eliminates any human error and ensures that all of the files have been uploaded and the commands run correctly.
To automate this we are using a service called deploybot, of course this can be done with other providers but the idea is that we deploy directly from git to our server. Whichever service you use, you will need to make sure that you can run commands on completion.
Our setup is that we work on a dev branch, and then merge our commits into a staging branch periodically. Whenever a change is detected on the staging branch we deploy to our staging server and on completion run composer update on the server, this of course is now all handled by deploybot. This means that we are left to code on our local environment and just merge to staging in version control whenever we need to push up a change and it’s all done for us.
How easily can other team members set this up?
Very easily! To set this up on another machine, all you need to do is install MAMP and composer and then import a zip of a default Craft CMS install into your database. Once this is done, we are into our usual process whenever we pull down changes, so just pull down from git and run composer update on the command line. The only difference is that after pulling down from git you may need to update the .env file to use your local database connection details.
After performing these steps you should be good to go! The hardest part here for non developers who just want to add some new fields is undoubtedly installed composer, but like I said, this only needs to be done once for the machine, so setting up future projects will be much easier once this is done as that step can be skipped.
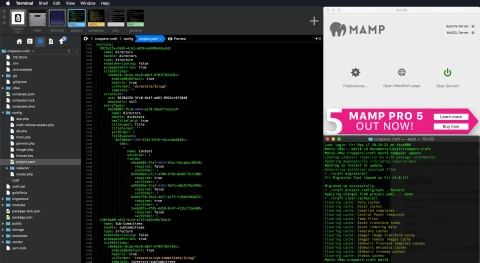
MAMP, Composer, and Project Config all running successfully
Conclusion
Local Development Environments have been around for a long time in this industry, but in more recent years they’ve become increasingly complex to set up with lots of additional features. We see an increasing amount of programs and services which require configuration and everyone has this done slightly differently. If like us you want a no fuss, no nonsense environment which still allows you the benefits of some of these more complex systems, then I hope that this article has been helpful.
We’ve created a local environment which is quick and easy to set up on additional machines and uses Craft and Composer to automate all of its necessary processes. This can also be used in other local environments such as Valet, Homestead, etc as all of our setup is basic Craft and Composer functionality, the main changes we made were to our own machines to install Composer locally, and updating the .env file which would need to be done anyway to ensure a connection to the locally hosted database. We’ve also created deployments to keep our staging environment up to date without the need for admins to login at all.
Local Development Environments don’t have to be difficult, especially when using a CMS as flexible as Craft. This can also be combined with our Highly Available Hosting Environments as deployments in deploybot allow us to connect to multiple servers from the same git repository.
This means that we can have, for example, 3 servers running the same Craft install, and whenever we merge changes into a specific git branch, these changes would be published to all 3 servers. The automation would also kick in to sync any further changes and clear the caches. This effectively means that we no longer have to add a new field to each of these 3 servers, we just add it once locally and our project config handles the rest as part of our automation we have set up.
