
High Availability Hosting for CraftCMS
—Introduction
When we build a site we try to make it as performant as possible, but the site will still suffer during major traffic spikes when hosted on a simple server setup. If we're working with a client who expects to have sustained periods of high traffic, then it simply isn’t good enough for the server to become slow and unresponsive.
In this scenario we need a hosting solution which will scale on demand. We need to be able to add additional servers under a load balancer to reduce the strain and be able to cope with high traffic periods. We also need to be able to scale this back down without losing any data or functionality during periods of lower traffic.
This is a situation for a Highly Available (HA) server environment. In a HA server environment we will be decoupling the database, cache, php sessions, assets, and other elements from each other. By breaking apart these components and hosting them separately, we can add new web servers to handle the traffic as needed which will have access to the shared sessions, assets, and data.
Matt Gray has created a good read on the reasoning for this decoupling in his How To Make Craft CMS 3 Highly Available article which I would recommend reading. We will now show you how we’ve taken these ideas and applied them step by step to a DigitalOcean / ServerPilot hosting environment.
We’re now going to be setting up 3 new servers along with a fresh Craft 3 install. You'll need a DigitalOcean account and a ServerPilot account if you wish to follow along, this can of course be done with other hosting providers also, but SSH access to the servers command line is required.
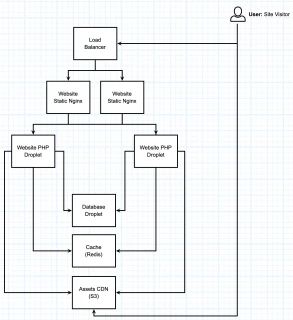
High Availability Server Environment Diagram
Creating a new droplet on DigitalOcean and ServerPilot
First things first, we need to create our server which our Craft installation will sit on. For now we're only going to have a single server for Craft whilst we are building the site. Once we are comfortable with our HA server environment and the site is ready to go live, we shall add additional servers to scale up our hosting accordingly.
As we're building a fresh new site, I would advise that you just create a small $5 droplet (server) in DigitalOcean with minimal specifications for now. This is all that we need whilst we are testing, we can resize it at any point if we need to. Let’s not raid the piggy bank whilst developing! The only traffic to our site for now will just be us and occasionally the client, so we shouldn’t need multiple servers for our web hosting layer just yet.
We will also be connecting ServerPilot to our new droplet which will handle the installation of our LAMP stack, this is a simple process done through your ServerPilot account. You will need the root users password for your droplet which should have been emailed to you upon creation of the server.
Need help with your digital strategy?
Get in touch — we'd love to hear about your project.
Creating a new app for our Craft install
This new droplet that we’ve created will host our Craft install, so lets go ahead and create a new app (site) within ServerPilot which we will call “craft” under a new ssh user also called “craft”. Very imaginative! Normally we would also create a database within this app, but in this instance we won’t be doing this as we want to decouple our database from this server and host it separately. Therefore there is no need to set this up right now.
Installing Craft to our droplet via composer
It's time to connect to our server over the command line using our craft ssh account which we just created and run through our installation process for Craft CMS via composer. Once the files are installed, we won’t be running the setup wizard just yet as we don’t yet have our database created, this means that Craft won’t have anywhere to create its schema.
At this point we have a Droplet (server) with an ssh/sftp account for Craft and a single app with Craft CMS installed via composer. We can visit this app in our browser by going to /index.php?p=admin/install and this should show us the default Craft installation page.
If you’ve made it this far and found it difficult, then I suggest you grab a glass of something stronger than coffee, as it’s about to get a whole lot worse. If you’d like to bail out, you can simply create a new database within your serverpilot app and run the installation using those connection details, and you’ll be ready to go with a basic Craft install. But that’s not why we’re here, we want to make it highly available and scalable, so let’s continue!
Remember to take regular breaks, you're certainly earning it today
Configuring a database server on DigitalOcean using the command line
Now that the basics are dealt with, we need to set about creating our database server which our Craft site will connect to. The reason that we’re doing this on a separate server is so that we can have multiple Craft servers connected to this database at the same time. This means that updating content on the site will affect all of the servers in play instead of just the one where the changes were made. For any changes to the fields, sections, etc we shall be using project config which was introduced with Craft 3.1 to sync these up from a dev site. Making these changes through the CMS will be disabled on the live environments.
By splitting off our database it also reduces the amount of processing that each server has to do as they are more focused on their individual tasks. When a single server is responsible for everything, a slow background process will make the entire site slow and unresponsive, this risk is lessened through our decoupling of elements.
To create our server we will need to create another fresh droplet (server) which will be called “database” This should be our 2nd Droplet that we’ve created if you followed the steps above to create our Craft server. For this database server we will once again be using the $5 entry level spec but we won’t be connecting serverpilot this time. We don’t need a full LAMP stack to be installed as this would just be overkill. We want a lean server where we only install what we need, this will reduce the number of background processes being run. As a result we will have a fast and secure hosting environment.
With our new database server created, we’ll be performing steps 1-3 of Initial Server Setup and then steps 1-4 of Setting up a remote database. We will stop at step 4 because we don’t want to install Wordpress, we want to use our beautiful Craft installation which we’ve already created on our first droplet.
Before we continue, it's also worth mentioning that when running through this process myself I received the following error: ERROR 1130 (HY000): Host '' is not allowed to connect to this MySQL server. To resolve this I found a fix on stackoverflow to grant us the correct database connection privileges.
At this point we should now have a functioning database server that we can connect to from our Craft server. When I went through this process I also added the firewall rules into the DigitalOcean firewall via the browser rather than doing this through the command line. This is just a personal preference so that we can manage these rules without needing to access the command line, we can also easily refer to them through the browser if needed.
Connecting Craft to our external database
It’s time to complete our Craft installation by running the setup wizard. You can either do this through the browser, or via the command line. My preference is to do it on the command line, but this is just a personal preference. As we enter our database connection details it will build up a pretty basic .env file for us.
Eventually once done we should have a fully installed functioning copy of Craft where our database sits separately on our new database droplet, separate to our main Craft CMS filesystem. You can verify this by going to Utilities => PHP Info in the Craft control panel and scrolling down to the section called Environment. Here you should see all of your .env files settings and can check that the IP address matches that of your database server. So far Craft has been easy to configure once the servers have been provisioned, this is all default functionality for this CMS.

The CMS can now access our database through stunnel
Creating a Redis server on Digital ocean using the command line
The next elements to decouple from our Craft server are caching and php sessions. The reason we do this is so that if you're logged in and a load balancer routes you to another Craft server when clicking through the cms, your session will still be available. If this session is held on the same server as the Craft install then you would be kicked out and have to log back in every time the load balancer directed you to a different server. This can cause absolute havoc with baskets on commerce sites! To get around this we will be setting up a redis server.
At this point we need to head back over into DigitalOcean and create a fresh new droplet, this will be our 3rd server we've created during this process and we will call it “redis”. Again, we will only be using the standard $5 spec and won't be connecting to ServerPilot as a full LAMP stack isn't needed. Instead we are going to configure our redis server ourselves with some help from the DigitalOcean tutorials.
When setting up a redis server it’s important to note that when we performed this process, we used stunnel to create our connections between the servers. Redis will also require some customisation in Craft before we can test that it's working. Another small hint is that if you ever need to stop or restart the redis server, then the commands can be seen on this stackoverflow post. Follow the links above and perform all of the steps and we shall see you on the other side.
Connecting Craft to our Redis server
Now that we’ve successfully created our redis server, we need to test that it's actually working. As stated before, we will need to customise Craft a little to do this. Our first step is to add "yiisoft/yii2-redis": "^2.0.0" to our composer.json file to install the yii redis extension.
In case you didn’t already know, Craft CMS runs on Yii, along with a couple of other frameworks but we won’t get into that right now. You will also find that you need to install the php redis extension onto the Craft server as this isn't added by ServerPilot during the installation process when we connected it to our droplet.
We will also need to adjust our servers php.ini file to use redis as its session handler. You can do this on the command line by logging in as root on the craft server and running the following:
nano /etc/php7.3-sp/php.ini
Now you can add the following lines:
        session.save_handler = redis
session.save_path = "tcp://127.0.0.1:8000?auth=<REDISPASSWORD>"
Save this file and restart the php server:
sudo service php7.3-fpm-sp restart
Finally you will want to edit your config/app.php file to use redis as a session handler.
        return [
    'components' => [
        'redis' => [
            'class' => yii\redis\Connection::class,
            'hostname' => 'localhost',
            'port' => 8000,
            'password' => getenv('REDIS_PASSWORD'),
            'database' => 0,
        ],
        'session' => [
            'class' => yii\redis\Session::class,
            'as session' => [
                'class' => craft\behaviors\SessionBehavior::class,
            ],
        ],
        'cache' => [
            'class' => yii\redis\Cache::class,
            'defaultDuration' => 86400,
        ],
        'queue' => [
            'class' => \yii\queue\redis\Queue::class,
            'channel' => 'queue',
        ],
    ],
];
Confirming that we are using our setup correctly and testing it
Now that we have redis in place and have configured Craft to use it, we need to check that this is actually happening. If there are no errors when loading the site and control panel pages then we can safely assume we have configured it correctly, but we should also go to Utilities => PHP Info again and do a search for Redis in our browser.
Our Session should have both redis and rediscluster as options within the “Registered save handlers” setting. We should also have a section for Redis with a version number and lots of default values. At this stage we should have all 3 of our droplets in place, configured, and talking to each other. We're almost there and the hard bit is done, so grab a biscuit and we will move onto dealing with our assets.
Decoupling Assets to S3
Our final task is to set up all of our asset sources to use Amazon S3 or a similar service. This is very simple in Craft CMS as you just need to install the first party plugin from the plugin store and then configure your asset source to use the correct S3 connection details.
We do this to ensure that any images uploaded to the cms will be shared across all of the server environments without needing them to be replicated on each droplet. The benefit to this also means that your dev environments will be able to access all of the images from the live site without having to pull them down from the servers. Hosting both the database and assets separately means that when we add an additional Craft server, it will already have access to all of the latest content.
Conclusion
We should now have a total of 3 servers, 1 of which holds the database, another hosting the php sessions and redis caching, and the final one holding our Craft install and files. These should all be connected to each other without any issues and sharing data between them securely behind the firewall rules that we’ve also created as part of this process.
We now have a good basis for our Highly Available hosting setup which we can build on, a server admins job is never truly finished though as there are always further optimisations to be found. For example, we still aren’t truly fully decoupled yet, but we’ve gone far enough to have made a significant step towards this.
Our next steps will be to move our cp resources onto S3 and split our public web server away from our php server using nginx. Once these steps are done we will truly be decoupled and scalable. This will mean that we can add in additional php and nginx servers at any point behind our load balancer without experiencing any issues for existing site visitors or causing any downtime.
By using git deployments and composer scripts we can also automate any changes to immediately affect all of our droplets hosting our Craft files and run any necessary updates, clear caches, sync project configs, etc. I will cover how to do this using project config, composer and git deployments next time.
When going through the process myself, I found that there wasn’t a single repository for all of the steps I’ve covered in this article and there was a fair bit of searching around to get the answers to things that should have been relatively simple, such as how to stop a redis server. I've included all of the links used in this article below so that they are easy to find for future usage if needed. We hope that this has been a good primer on how to create your own Highly Available hosting environment for Craft 3. Thank you for your time.

Congratulations, you've finished configuring your High Availability hosting environment!
Useful Links
- https://www.digitalocean.com/community/tutorials/initial-server-setup-with-ubuntu-16-04
- https://www.digitalocean.com/community/tutorials/how-to-set-up-a-remote-database-to-optimize-site-performance-with-mysql-on-ubuntu-16-04
- https://stackoverflow.com/questions/19101243/error-1130-hy000-host-is-not-allowed-to-connect-to-this-mysql-server/19101356#19101356
- https://www.digitalocean.com/community/tutorials/how-to-set-up-a-redis-server-as-a-session-handler-for-php-on-ubuntu-16-04
- https://stackoverflow.com/questions/6910378/how-can-i-stop-redis-server/39806945#39806945
- https://www.digitalocean.com/community/tutorials/how-to-encrypt-traffic-to-redis-with-stunnel-on-ubuntu-16-04
- https://github.com/yiisoft/yii2-redis
- https://serverpilot.io/docs/how-to-install-the-php-redis-extension
- https://mattgrayisok.com/how-to-make-craft-cms-3-highly-available
- https://github.com/craftcms/cms/issues/3428
- https://gist.github.com/khalwat/a0687a8a8f0bf3ef5db7c371d88d3e04
- https://nystudio107.com/blog/static-caching-with-craft-cms
- https://blog.digitalocean.com/horizontally-scaling-php-applications/
