Casting a critical eye - what makes a bad photo?
—As you can imagine, we see a lot of photos from our clients as part of a website build. Our clients come from a wide range of industries and are experts in their own fields. We are proud to have clients from so many sectors including Travel & Tourism, Food & Drink, Law, and Sports & Leisure. But one thing many of our clients have in common is that they are not professional photographers.
Not every photograph used on a website needs to be a work of art. But over the years we have been privy to some questionable photography skills. While we will do what we can to improve any photos we receive, life is easier if the images we receive are of a good quality to start with. There is only so much cropping, colour balancing and digital touch-ups can achieve.
We prefer it when clients provide a small number of carefully taken photos over receiving hundreds (yes, hundreds) of completely unusable images.
So, with the rant out of the way, what common pitfalls have we noticed over the years? And how can you avoid them?
Note: This is a guide of how to avoid taking bad photos, which is not the same as how to take a good photo. For that, I'd recommend attending some photography classes. I will also provide examples of how my "rules" can be broken if you have the skills and knowledge to do so.
The Basics
Is it blurry?
There are two ways that a blurry photograph can be your downfall. The main way is that the whole photo is out of focus. A shaky hand, an automatic focus struggling with the subject matter, a manual focus that is a bit off. Regardless of why the image is out of focus, if it is blurry, it is no good.
The other way, is if you are taking a photo of a particular subject, item, or person, but the depth-of-field is out. The image is clear just in front or behind the subject, leaving the subject itself out of focus and blurry.
This is something you are more likely to experience if you are an amateur photographer with a DSLR rather than using a "point and click" camera (or even your phone). You are trying an effect but the focus is just off slightly (trust me, I know). If you end up with the subject just out of focus like this, the image is still no good.

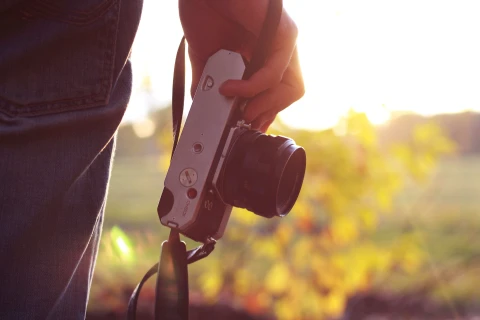
Blurry isn't always bad. Here the blurry background helps focus your attention on the camera
Is it straight?
Where you in a hurry when taking the photo, leaving you with an image that is far from straight? We see this when people are taking a photo in a busy environment and they are trying to catch the moment. Capturing images at busy events is difficult. But we have also seen people taking photos while walking. That image will never be straight! It will probably also fall foul to being blurry too.
Not all images that aren't straight are for the bin. If it is only slightly off, you can rotate and crop the image to make it straight without losing too much of the visual. Things like the horizon or a level surface are useful for checking if your image is straight.
That said, be careful when rotating an image to make it straight, as this can have some unexpected effects on your verticals. More on verticals below.
Your Environment
Where and when you take the photo can make all the difference. Most people realise that taking a photo at night (without a tripod) isn't going to work, but a sunny day can present problems too.
Is the image overexposed?
Are parts of the image too white or faded out? In photography terms, this overexposure is known as blow out or blown highlights. Common areas of your photo that may suffer from blow out include the sky, especially on a sunny day, and people's faces if a flash has been used.
If you have blow out, chances are that the image looks faded and washed out. But with that said, it is also a popular style, if you know what you are doing.
Need help with your digital strategy?
Get in touch — we'd love to hear about your project.
The sky in this image is blown out but here it works. The blown highlights soften the image and directs your eye to the camera
Was the weather poor?
In the UK, we suffer a lot from less than perfect weather conditions. Grey skies are unfortunately quite common. However, nobody enjoys looking at a landscape image of a beautiful mountain side, with a dull grey sky; it takes away from the whole visual of the thing.
Was it raining, foggy or misty when you took that landscape photo? Was it a dull day in January? Chances are that the cloudy sky has ruined your photo. Or there was not enough daylight to capture the vivid greens of the fields, leaving everything looking a bit flat and sad.
Did you take the photo through a window?
Short answer - If you said yes, bin it.
Longer answer - These almost always look bad because of tiny specks of dirt or scratches on the glass. And little reflections through the glass that get picked up by the camera lens. As with most points, if you understand what you are doing, you can achieve a cool visual effect. If in doubt, double-check the short answer.
Where you in a dark room?
The word photo comes from the Greek word for light, and that's just what you need to take a good photo. If you are taking a photograph inside, turn on some lights. Otherwise your image will be underexposed and dark.
Did you use a flash? Was it the one on the front of the camera? Chances are that this has really screwed up your exposure. Have you ever seen photos of bright white faces floating in a sea of black? My mum was an expert at this in the 90's with an old point and click camera that used film and a front flash that had to warm up for a few seconds. Not a flattering look on anyone. We deserve better. Don't do it.
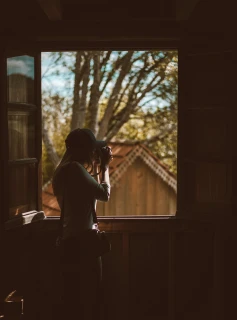
Taken in a dark room, this photo works because the light highlights the silhouette of the photographer while the outside creates a colourful background
Are the colours correct?
Look at the different areas of the image and check that the colours look right. As mentioned above, images can be over or underexposed causing colours to be too dark or too light. But you can also end up with colours looking all messed up because of poor or artificial lighting. Such as that image of the blue and black dress. Or was it white and gold?
Also, what colour is this shoe?
Some colours can be tweaked later in post-production, using a tool like Photoshop. But this should really be about minor adjustments to get the colours just so, not making huge changes to the colour balance. Otherwise you can end up with some weird 'other-worldly' effects.
Wait, What's That?
Taking the time to take the photo properly saves so much time in post-production. Or in layman's terms, using Photoshop to clean up any mistakes. Perhaps the first thing any budding photographer should learn is to see what you are actually taking a photo of. Check everywhere in the lens. Is there something in the background (or foreground) that you don't want to be in the shot? And just where did you leave your bag anyway?
Is there anything in the photo that shouldn't be there?
It is always amazing what you see after you've taken the photo. You
are so focused on taking the photo of an interesting looking tree that
you didn't even notice the man talking on his phone that has crept into
the corner of your otherwise perfect shot. Photo-bombing really is the
perfect term for this.
The other usual suspects for ruining your images are bags, whether a rucksack, camera bag or a handbag. You set it down so that you could take some photos, only to end up taking pictures of it by mistake.
Other items can sneak into the corners of your image without you noticing. Or there can be finer details not quite right, which you won't notice until later.
Is there any dust, dirt or smears?
You might not realise your table needs wiping down until you look at the photo and see all those smears and fingerprints on the surface. Or that your fireplace could do with a dusting thanks to all the dust and dirt you have picked up in your image. It amazes me what we can look past or even fail to notice in real life, but which draws your eye in when photographed. Like that spider's web in the light-fitting.
Is there any weird reflections?
Like dust and dirt, weird reflections can distract the viewer's attention away from the subject matter and onto a weird glow from the window or off a reflective surface.
And be wary of mirrors and other highly polished surfaces that show off what's going on 'off-shot,' such as that questionable t-shirt you have on today. Glasses and bottles are also difficult to photograph for this very reason.
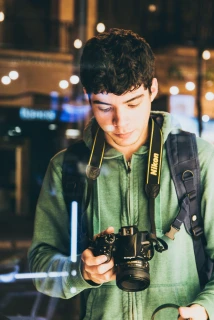
Taken through glass and with weird relections, this is still works because it gives us the impression of a busy city
Photoshop to the rescue?
Some of these things can be taken out or fixed in post-production, using tools such as Photoshop. However, this adds time (and therefore cost) to a project. And depending on the skills of the user, sometimes it is obvious that an image has been edited, often with hilarious consequences. The key is that a little touch-up here and there is OK, but if huge areas of the photo need repainting, it's probably best to retake the photo instead.
Photographing People
Are there any people in the photo?
Perhaps more of a legal consideration than necessarily making the photo a good or bad one; but one which can make an image unusable, regardless of its quality. If there are people in the photo and they aren't models, or haven't given consent, or aren't aware that they are attending an event where lots of photos will be taken (such as a conference or festival), it is probably best to avoid taking and using images with people in them. This is especially prudent advice if there are children in your photo.
Is the photo of the person's back?
Perhaps you have a situation that is fine to include a person in, and research certainly agrees that including images of people helps engagement. However, this is only true if the user can see the person's face. This builds trust and sets the emotional tone. If the photo is of someone's back, then this feels like looking at someone's back in real life; that you are being blocked out of the conversation, that you are not welcome to the situation.
As with all things, there are exceptions to this rule.
Other Considerations
Are there any visual blocks or obstructions?
Is there anything in the foreground that is creating a visual block? The corner of a counter top? A tree branch hanging down in shot? A bush obscuring the view? Not only can these items hide the real subject behind them, but they can also create weird angles and harsh corners, which aren't visually appealing.
Not only do they not look good visually, but in our experience, they are also usually in places that are hard to crop out without losing your main subject matter too.
As with things creeping in from the sides, looking carefully at what you are actually taking a photo of, and you will avoid this mistake.
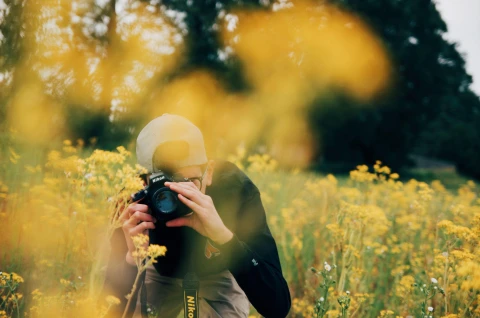
The flowers in the foreground would normally be a visual obstruction, but here they tell the story of what the other photographer is shooting
Are your verticals vertical?
As promised above, let's talk about verticals in photography terms. Verticals are your straight lines. Are they straight and parallel, rather than converging? Paying attention to your verticals is especially important with architectural and interior photography, where man-made straight lines are very pronounced. When these aren't parallel, or are converging, the image looks very distorted.
If you want to know more about verticals and how to avoid them, this article goes into a lot of detail. However, as shown in the examples in the article, converging lines can work if it is obvious that this was done for effect. If the lines are only slightly converging, something you are much more likely to do by accident, the image just looks off.
Final Thoughts
While all the points I raised above are common pitfalls we see our clients make with their photography, I would argue that for an experienced photographer achieving a certain effect, every single one of these rules can be broken. But as with all rules, you first need to learn them before you can understand how and when to break them.